Recording a Ride
Bike IQ puts every metric on one screen with no pages to swipe through. Here is how to start a ride, what you see while riding, and how your data gets saved.
Starting a Ride
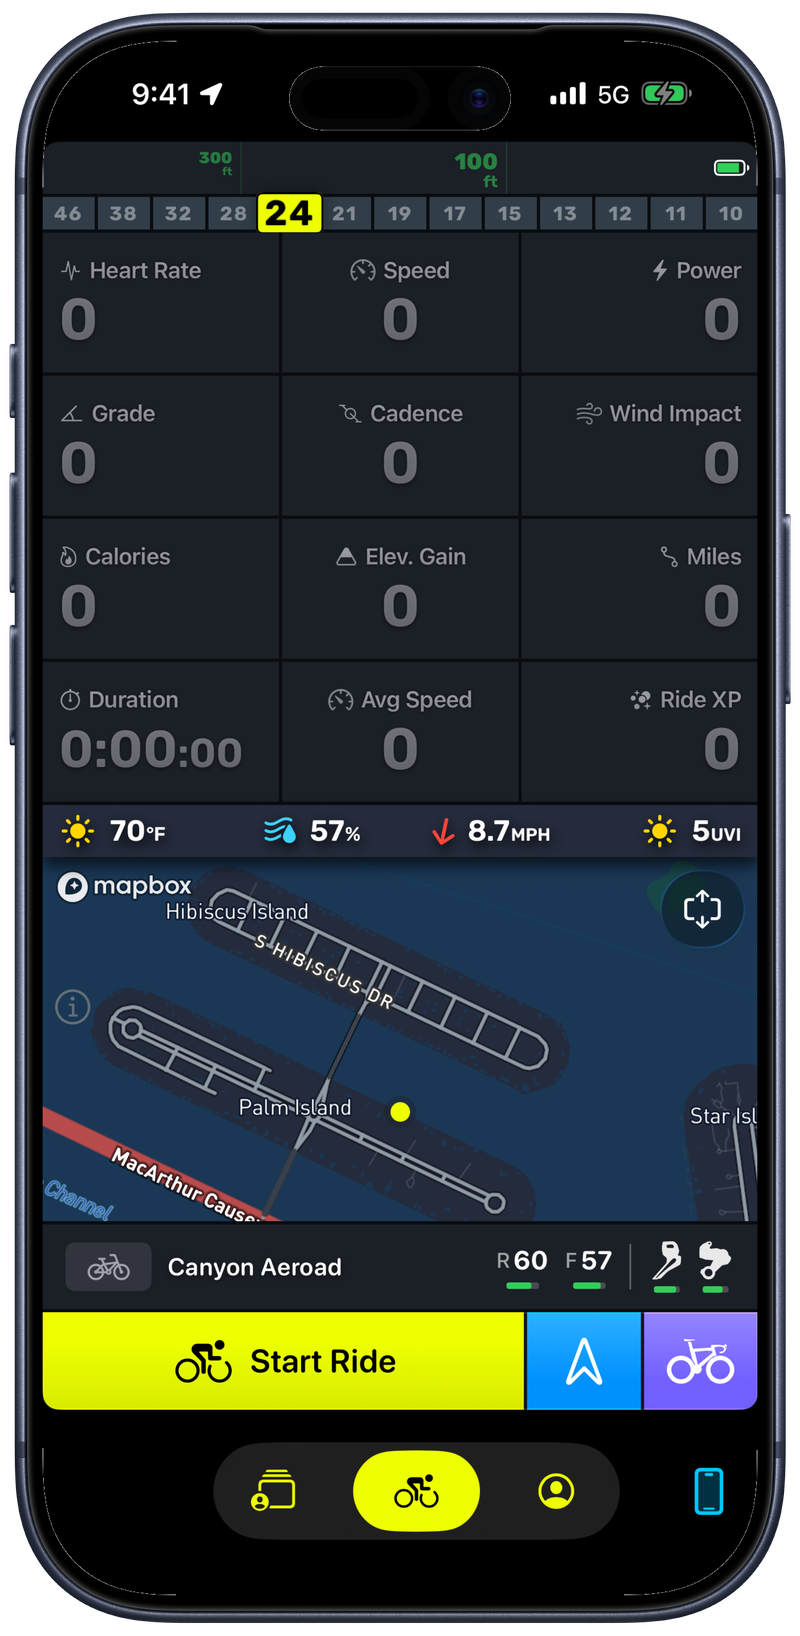
Open Bike IQ and wait for GPS lock. You will know it is ready when the map centers on your current position. If you have multiple bikes configured, select the correct bike profile so the app uses the right weight, tire type, and aerodynamic settings for your power estimates.
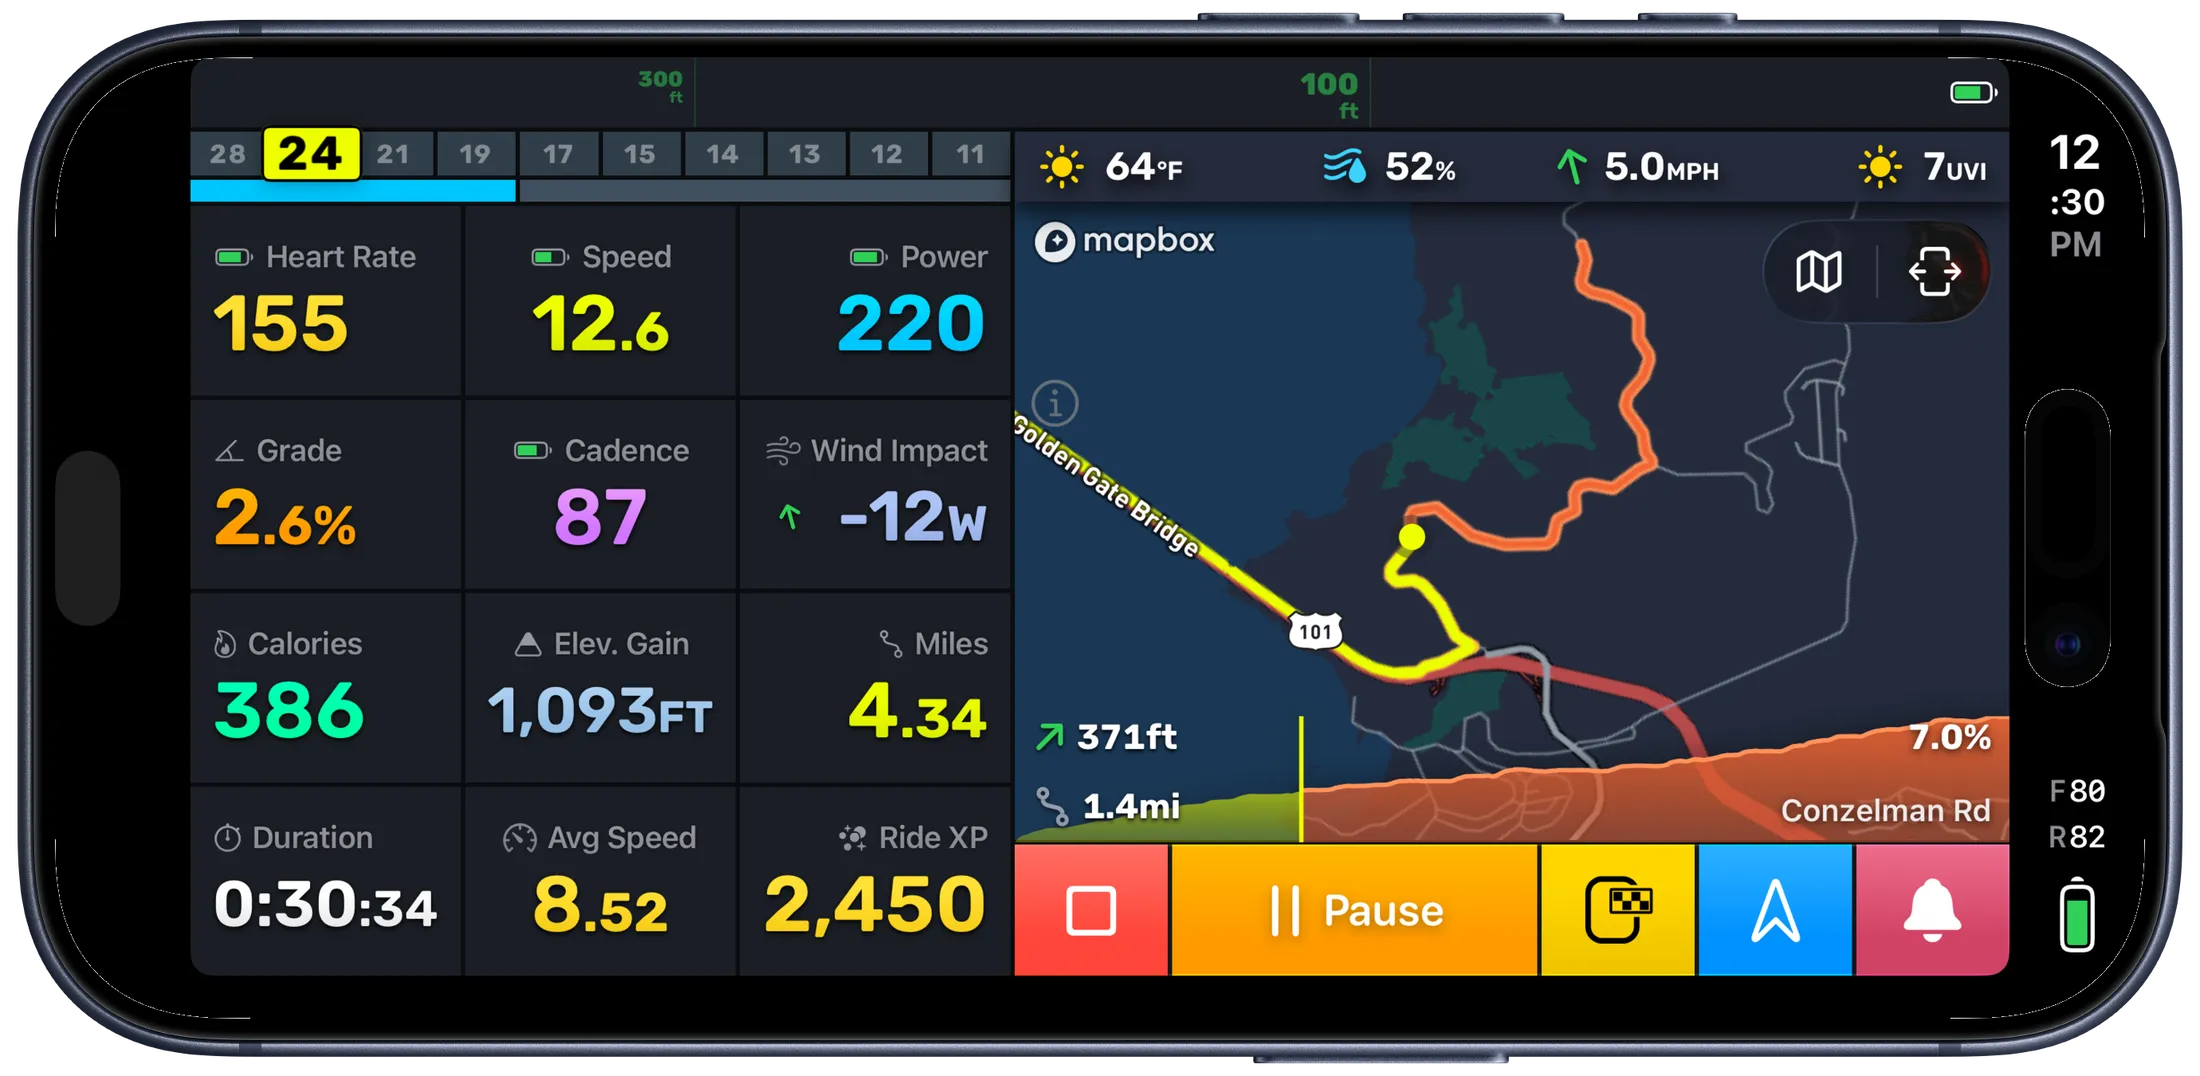
Tap Start Ride. The ride screen appears immediately with your live map, speed, power, grade, distance, timer, and any connected sensor data. There is no warm-up delay and no calibration step. The virtual power meter works from ride one.
The Ride Screen
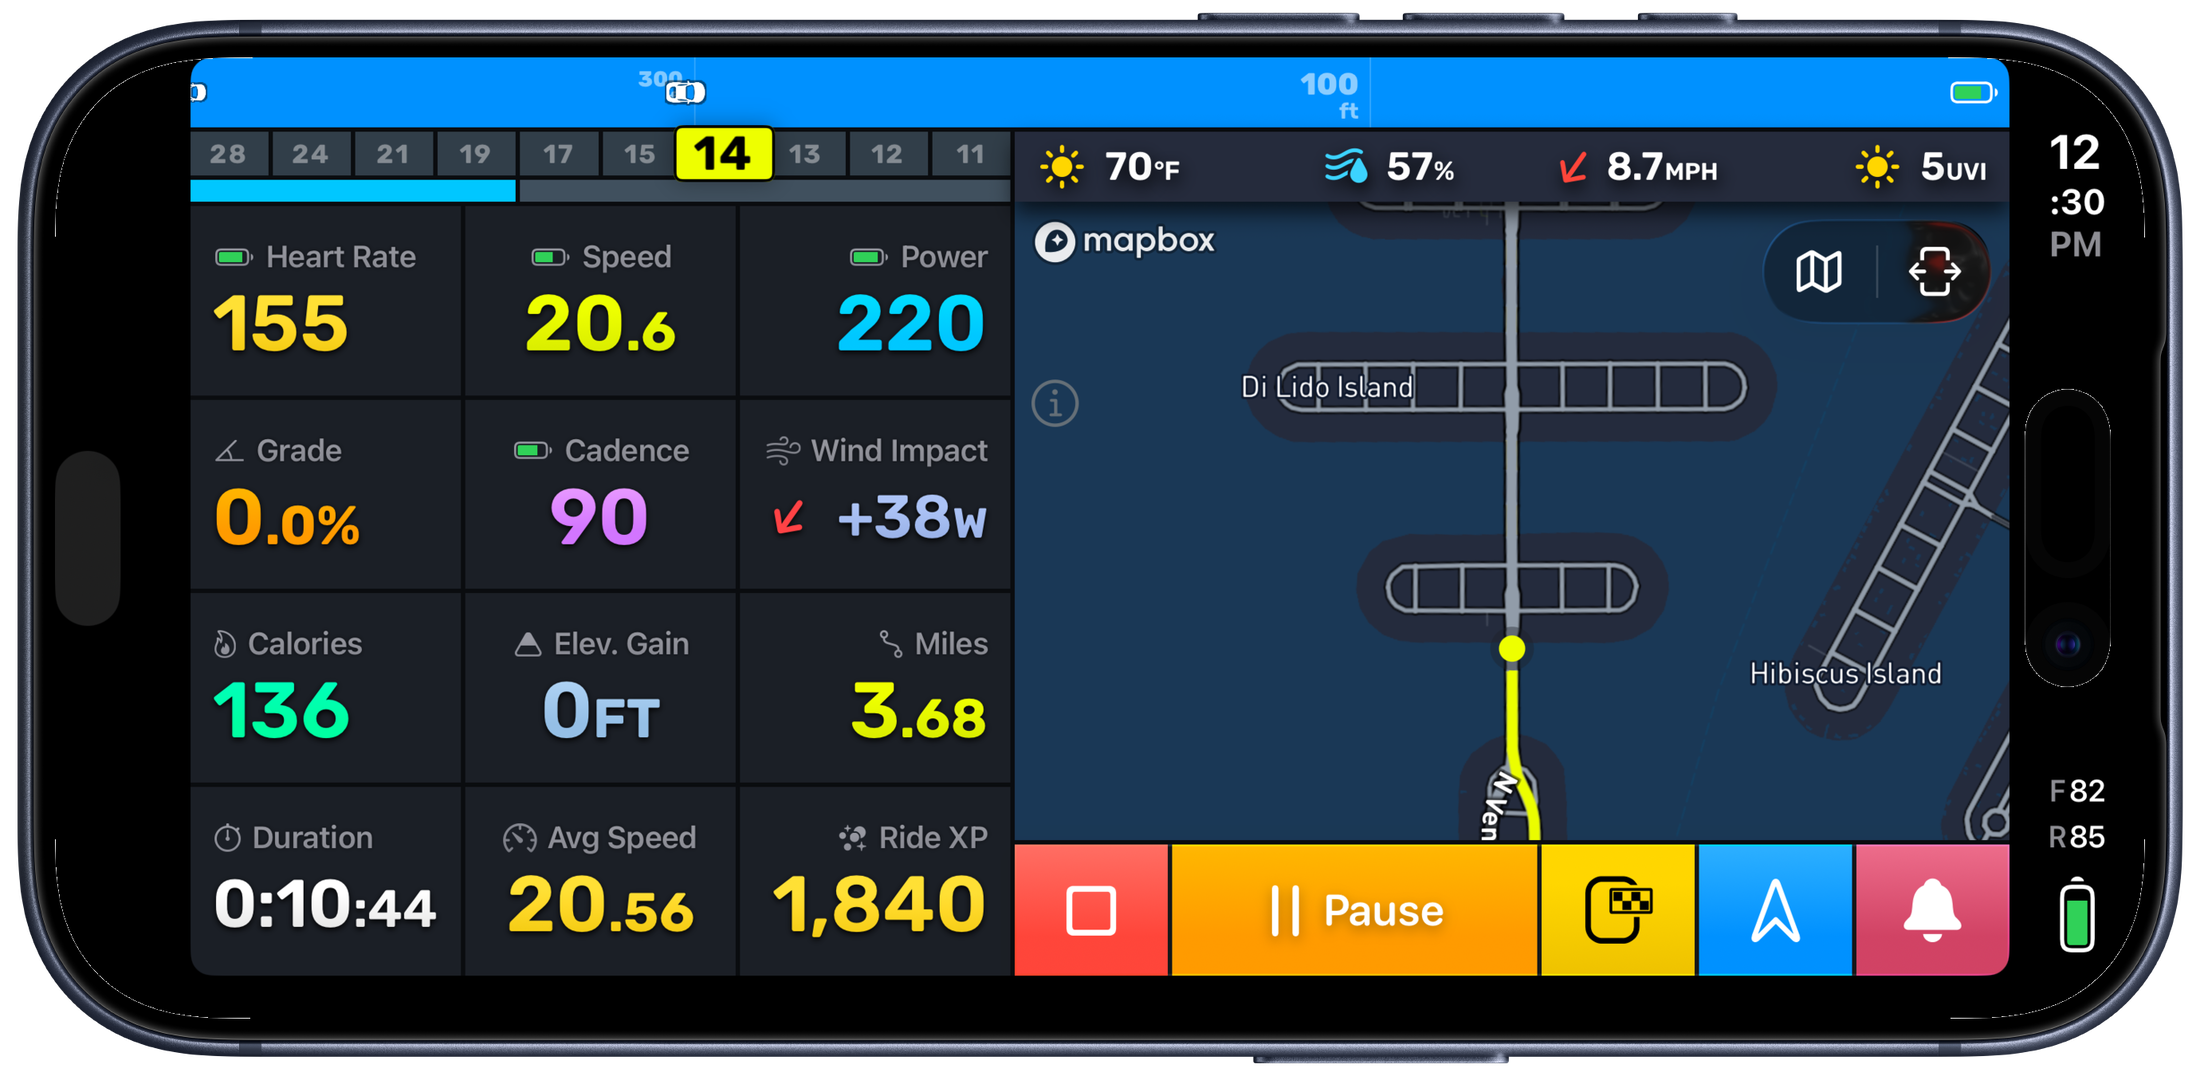
Everything is visible at once. No swiping, no second screens. While riding you see:
- Live map with your position tracking in real time
- Speed from GPS
- Power in watts, either virtual or from a paired power meter
- Grade as a percentage, measured from the barometer
- Distance and elapsed time
- Heart rate if a Bluetooth HRM is paired
- Cadence detected from your iPhone's motion sensors, or from a paired cadence sensor
- Wind impact and current weather conditions
- Elevation gain accumulated over the ride
- XP progress tracking your level and milestones
One or two rides and the layout becomes second nature. At a glance you know your effort, your terrain, and your conditions.
Auto-Pause

Enable auto-pause in Ride Assist settings to automatically pause recording when you stop moving, whether at a traffic light, a cafe, or a rest stop. Recording resumes the moment you start pedaling again. With auto-pause on, the timer shows moving time rather than total elapsed time, giving you a cleaner picture of your actual effort.
When auto-pause triggers, the session controls change to display an auto-pause icon marked with an (A) in yellow. This makes it clear at a glance that recording has been paused automatically rather than manually. The timer continues to show moving time only — time spent stopped at traffic lights, intersections, or rest stops does not count toward your elapsed time or affect your average speed.
When you start moving again, recording resumes instantly without any interaction. You do not need to tap the screen or press any button. Just start pedaling and the app picks up right where it left off.
The wait-for-movement threshold in Settings controls how long you need to be stopped before auto-pause activates. A shorter threshold pauses sooner, which is useful for city riding with frequent stops. A longer threshold avoids pausing during brief slowdowns like tight corners or crowded paths.
Manual Pause and Resume
Long-press the Pause button for 1 second to pause manually. The hold gesture is intentional — it prevents accidental pauses from bumps or stray touches while riding. If you tap without holding long enough, a brief message explains the requirement (you can dismiss this reminder permanently).
When manually paused, the Pause button changes to a yellow Resume button. All your metrics and the map remain visible while paused, so you can review your ride data during the stop. Tap Resume when you are ready to continue recording.
An unpause reminder is available in Settings to nudge you if you start moving again but forget to resume. This is configurable — you can set how long you need to be moving before the reminder triggers, or disable it entirely if you prefer to manage pauses yourself.
Screen Lock and Background Recording
If your iPhone screen locks during a ride, GPS recording continues in the background. Location and audio services keep running. Wake the phone anytime to check your metrics. There is no gap in your data, no lost GPS points, and no need to keep the screen on for the entire ride.
Voice Control
Hands-free voice commands let you control the ride without touching the screen. You can start, pause, and mark laps by voice, keeping your hands on the bars and your eyes on the road.
Lap Marking
You can mark laps during a ride to segment your effort into distinct sections. Tap the lap button on the session controls, or use a voice command to mark a lap hands-free.
Each lap records its own set of metrics including distance, time, average power, and average speed. This lets you compare effort across different portions of the same ride without needing to do any manual calculation.
Laps appear in the Ride Report with per-lap statistics, making it easy to review how your effort varied throughout the ride. You can also add, remove, or adjust lap markers after the ride from the report. This is useful for interval training, structured workouts, or simply marking significant points along a route — like the start of a climb, a sprint segment, or a transition between road types.
XP and Ride Leveling
Bike IQ tracks ride XP (experience points) as a gamification element layered on top of your core cycling data. XP accumulates during your ride based on your effort and distance covered.
The Ride XP widget on the ride screen shows your current session XP in real time, so you can watch your progress grow as you ride. XP contributes to your overall rider level and milestones, giving you long-term goals to work toward across multiple rides.
The XP system adds a motivational layer without replacing or obscuring the core metrics. Your power, speed, distance, and time remain front and center. XP is there for riders who enjoy a sense of progression and achievement alongside their training data.
Bike Bell
Bike IQ includes a bike bell that you trigger with a palm gesture over the screen or by tapping the bell button. The sound is configurable in Settings.
When headphones are connected, the bell automatically switches to play through the phone speaker so that pedestrians and other cyclists can actually hear it. After the bell finishes, audio returns to your headphones without interruption.
Ending a Ride
Long-press the End button for 2 seconds to finish your ride. The button shows a visual expanding animation as you hold, confirming progress. The longer hold time protects against accidental taps — ending a ride is irreversible mid-recording.
After ending, you see the post-ride decision screen where you can save, discard, or resume. See Finishing a Ride for details on saving, Strava publishing, and crash recovery.
Navigation Shortcuts
The navigation button opens your route library, but it also has a hidden shortcut: long-press the navigation button to open a context menu showing your favorite destinations. Tap any favorite to start navigating there immediately — no need to open the full route planner. This is especially useful mid-ride.
If you are currently following a route, the context menu also shows an End Navigation option to stop turn-by-turn guidance while continuing your ride recording.
Bike Selection
The bike selector is available before starting a ride and while paused. Tap it to switch between your configured bike profiles. The selected bike determines which sensors are used and which physics parameters feed the power model.
Session States
The controls change appearance based on your current ride state:
- Not started: Start Ride button, bike selector, and navigation button visible
- Active: Pause, End, Lap, Bell, and navigation buttons visible
- Paused: Resume and End buttons, with the option to change bikes
- Auto-paused: An auto-pause indicator replaces the Pause button, confirming the ride paused automatically due to no movement
- Ended: The save/discard/resume decision screen
Tips
- Mount your phone on the handlebars. A stem or bar mount keeps the screen visible and your hands free. See the iPhone as bike computer guide for mount recommendations.
- Reduce screen brightness on longer rides. The display is the biggest battery draw. Dimming it significantly extends your recording time.
- You do not need sensors to get started. The virtual power meter estimates watts from your phone's GPS, barometer, and accelerometer plus weather data. Pair Bluetooth sensors when you are ready, but they are not required.
- Use auto-pause for city riding. Frequent stops at lights inflate your elapsed time. Auto-pause keeps your averages honest.
Related Guides
- Finishing a Ride: save, share to Strava, crash recovery
- Ride Report: understanding your post-ride data
- Virtual Power Meter: how the physics model estimates your watts
- Bluetooth Sensor Pairing: connecting heart rate, power, cadence, and speed sensors