Apple Watch Companion App
The Bike IQ Apple Watch app turns your Watch into a heart rate monitor for cycling. It streams HR data to your iPhone during rides and displays your current heart rate zone on your wrist.
What the Watch Does
The Apple Watch acts as a companion heart rate source, not a standalone bike computer. Your iPhone remains the primary device, mounted on your handlebars where you can see your full dashboard of metrics. The Watch supplements it by streaming heart rate data that feeds into your ride recording, heart rate zone tracking, and calorie calculations.
This means you do not need to buy a separate chest strap or arm band heart rate monitor if you already own an Apple Watch. The Watch's optical sensor provides continuous heart rate readings throughout your ride.
Installation
The Bike IQ Watch app installs automatically when you install Bike IQ on your iPhone, as long as your Watch is paired and the automatic app installation setting is enabled. If the app does not appear on your Watch, open the Watch app on your iPhone, scroll to the list of available apps, find Bike IQ, and tap Install.
No additional configuration is needed on the Watch itself. All settings are managed from the Bike IQ app on your iPhone.
How It Works During a Ride
When you start a ride in Bike IQ on your iPhone, the Watch automatically begins a mirrored workout session. The Watch starts collecting heart rate samples via HealthKit and streams them to the iPhone over the Watch Connectivity framework. You do not need to open the Watch app or tap anything on your wrist. The session starts and stops in sync with your iPhone ride.
When you end the ride on your iPhone, the Watch session ends automatically and the Watch app returns to its idle state.
Controls on Your Wrist
The Watch is not read-only. Swipe left from the first metric screen and you reach a controls page with Pause and Resume, a Lap button, and Hold to End, which takes a two-second press so a brush against a sleeve cannot end your ride.
That matters most when your iPhone is mounted somewhere awkward or sitting in a jersey pocket. Marking an interval or pausing at a light no longer needs the phone in your hand. Anything you do on the wrist is the same ride: there is one recording, on the iPhone, and the Watch is operating it.
What You See on the Watch
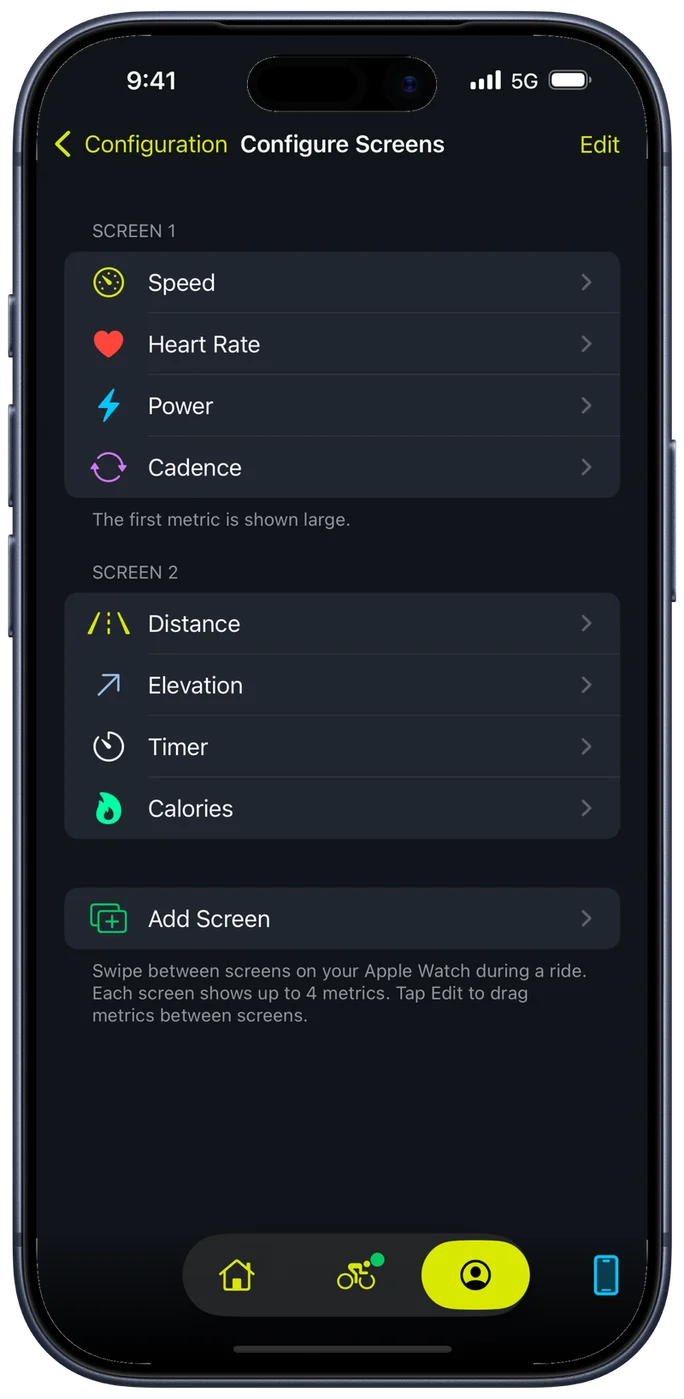
The Watch shows your ride metrics across a set of screens you swipe between, four to a screen, with the first metric of the first screen drawn large so it reads at arm's length. Bike IQ starts you with two: speed, heart rate, power and cadence, then distance, elevation, timer and calories.
While you are following a route, a turn sign appears at the top of the Watch screen with the maneuver arrow and the distance to the turn, in the same blue as the navigation on the iPhone. It shows up only while navigating and disappears afterwards, so it costs you nothing on a free ride.
Heart rate carries its zone color. The five zones (Recovery, Endurance, Tempo, Threshold, VO2max) use the same colors you have configured in your Bike IQ Settings on the iPhone. There is no separate zone configuration on the Watch, and colors and zone boundaries sync automatically.
Choosing Your Watch Screens
Open your profile, then Apple Watch, then Configure Screens. The screen lists one section per Watch screen, and you build them the way you want to read them on the bike.
- Tap a metric to swap it for another. If the one you pick is already on a different screen, the two trade places, so choosing never quietly drops a metric off your Watch.
- Add Metric fills a free slot. A screen holds up to four.
- Add Screen adds another, up to six.
- Swipe a metric away to remove it, and tap Edit to drag metrics around within a screen or between screens.
Fourteen metrics are available: Speed, Avg Speed, Heart Rate, Power, Cadence, Grade, Distance, Elevation, Timer, Calories, Gear, Radar, Wind Impact and Ride XP. You do not have to use them all. Leaving a metric off keeps it out of your way, so a short swipe gets you to the numbers you actually read while riding.
Battery Monitoring
The Watch periodically sends its battery level to the iPhone. This lets you monitor Watch battery status during long rides without needing to check the Watch directly. If your Watch battery is running low, you will know from the iPhone screen.
No Manual Pairing Needed
Unlike Bluetooth heart rate monitors, the Apple Watch does not require a pairing step in Bike IQ. If your Watch is on your wrist, paired with your iPhone through the standard Apple Watch pairing, and the Bike IQ Watch app is installed, heart rate data flows automatically when you start a ride. There is no scanning, no device selection, and no connection step.
Tips for Accurate Heart Rate
The optical heart rate sensor on the Apple Watch works best when the Watch band is snug but comfortable. A loose band allows the sensor to shift on your wrist, especially on bumpy roads, which can cause gaps or inaccurate readings. Make sure the Watch sits flat against your skin without being tight enough to restrict circulation.
The Watch does not need to be in a specific workout mode or on a specific watch face. Bike IQ handles the workout session entirely. You can leave whatever watch face you normally use. The Bike IQ Watch app activates in the background when the ride starts.
Apple Watch vs. Chest Strap
For most recreational and fitness-oriented cycling, the Apple Watch provides reliable heart rate data. If you need clinical-grade accuracy for structured interval training, a Bluetooth chest strap paired directly to Bike IQ may provide more consistent readings during very high intensity efforts. See Heart Rate Sensors for a comparison of sensor types.
Related Guides
- Heart Rate Sensors: comparing Apple Watch, chest straps, and arm bands
- Bluetooth Sensor Pairing: connecting external sensors to Bike IQ
- Settings and Customization: configuring heart rate zones and display preferences