Bike Profiles
Bike IQ supports multiple bike profiles, each with its own physics configuration and sensor assignments. Setting up your bikes correctly is the foundation for accurate power estimates, gear tracking, and speed calibration.
Why Bike Profiles Matter
The virtual power meter uses bike-specific parameters to estimate your watts. A carbon road bike at 7 kg with drop handlebars has different aerodynamic drag and rolling resistance than a steel gravel bike at 10 kg with flat bars. Without the correct profile selected, power estimates will be based on the wrong bike's characteristics.
Beyond power accuracy, each bike profile remembers its own Bluetooth sensor assignments. Your road bike can use one power meter while your gravel bike uses a different one, and Bike IQ connects to the right sensors automatically when you select a bike.
Your Garage
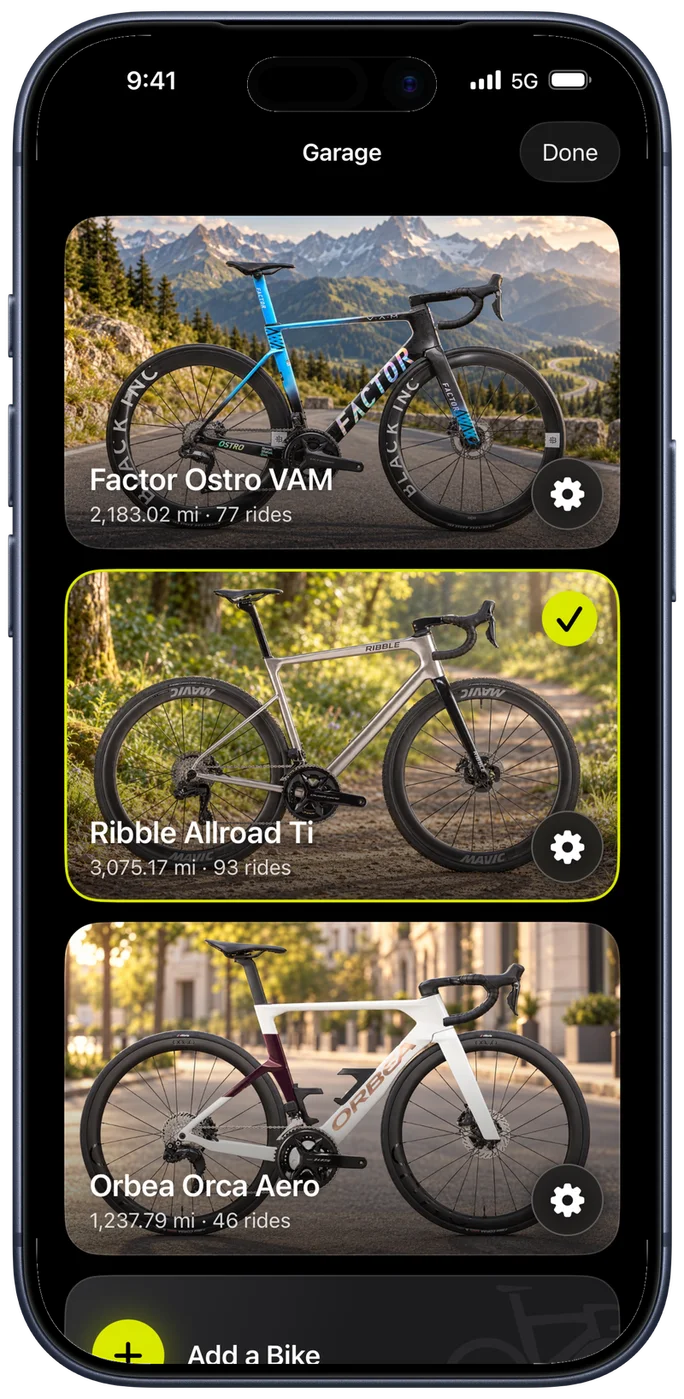
Your bikes live in the Garage, one photo card each. Tap a card to make that bike the one you are riding: the card picks up an accent ring and a checkmark, and Bike IQ switches to that profile's weight, tires, and sensors. Tap the gear on a card to open that bike's settings instead.
Press and hold a card to lift it, then drag to put your bikes in the order you want. The order sticks, and it is the same order you see everywhere else a bike is listed.
Adding a Bike
Tap Add a Bike at the bottom of the garage and search by brand, model, or year. Pick your bike from the results and Bike IQ fills in the weight and gearing from the catalogue, along with a photo, so a new bike is usually configured before you have typed anything beyond its name.
If your bike is not in the catalogue, tap Add Custom Bike and enter the details yourself. Either way, you can change anything afterwards.
You then confirm the settings that feed the physics model:
- Name: a label you will recognize, such as "Ribble Allroad Ti" or "Gravel Rig". Tap the name over the photo to change it at any time.
- Bike Weight: the weight of the bike itself, accessories included. Combined with your body weight from your rider profile, this gives the total system mass used in power calculations. Accuracy matters most on climbs, where weight is the dominant factor.
- Tire Type: Slick or Knobby. This sets the initial rolling resistance coefficient. Slick tires roll with less resistance on pavement; knobby tires have higher resistance but are appropriate for off-road surfaces.
- Tire Size: the starting point for wheel circumference, which turns a speed sensor's wheel rotations into distance and speed. Pair a speed sensor and Bike IQ calibrates the circumference itself from GPS, so this only has to be close.
- Handlebars: Flat bar, Drop bar, or Aero bar. This sets the initial aerodynamic profile. Drops and aero positions present a smaller frontal area to the wind, resulting in lower drag and different power estimates at the same speed compared to an upright flat-bar position.
The Bike's Photo
A bike picked from the catalogue arrives with its own photo. To use your own, tap the brush on the photo and choose Camera or Library. Drag to move and pinch to zoom until the bike sits where you want it in the card, straighten it if the horizon is off, and tap Done. Reset puts the framing back, and Remove Photo clears it.
Every photo is stored at the same shape, so the cards in your garage stay the same size however you frame them. A bike with no photo still gets a card.
Drivetrain Configuration
Enter your front chainring tooth counts (48/35 for a standard double, or a single ring size for 1x setups) and your cassette range (10-33, for example). Bike IQ uses these values to calculate the gear ratio for each front-rear combination. A bike added from the catalogue arrives with its real gearing already filled in.
Gearing is what makes gear tracking work: Bike IQ can display your current gear, record every shift, and show gear usage patterns in the ride report. It works with a SRAM AXS or Shimano Di2 groupset paired as a sensor, and without an electronic groupset it estimates your gear from speed and cadence.
Sensor Assignments
Each bike remembers its own set of Bluetooth sensors. This is useful if you have different power meters, speed sensors, or cadence sensors on different bikes. When you select a bike before starting a ride, Bike IQ automatically connects to that bike's assigned sensors.
Open the bike's settings and tap Connect Bluetooth Sensors under Sensors. The sensor screen lists what is already on this bike, what is on you, and what is nearby, and adds anything you tap to the right place. The assignments persist across rides. See Bluetooth Sensor Pairing for details on supported sensor types and the pairing process.
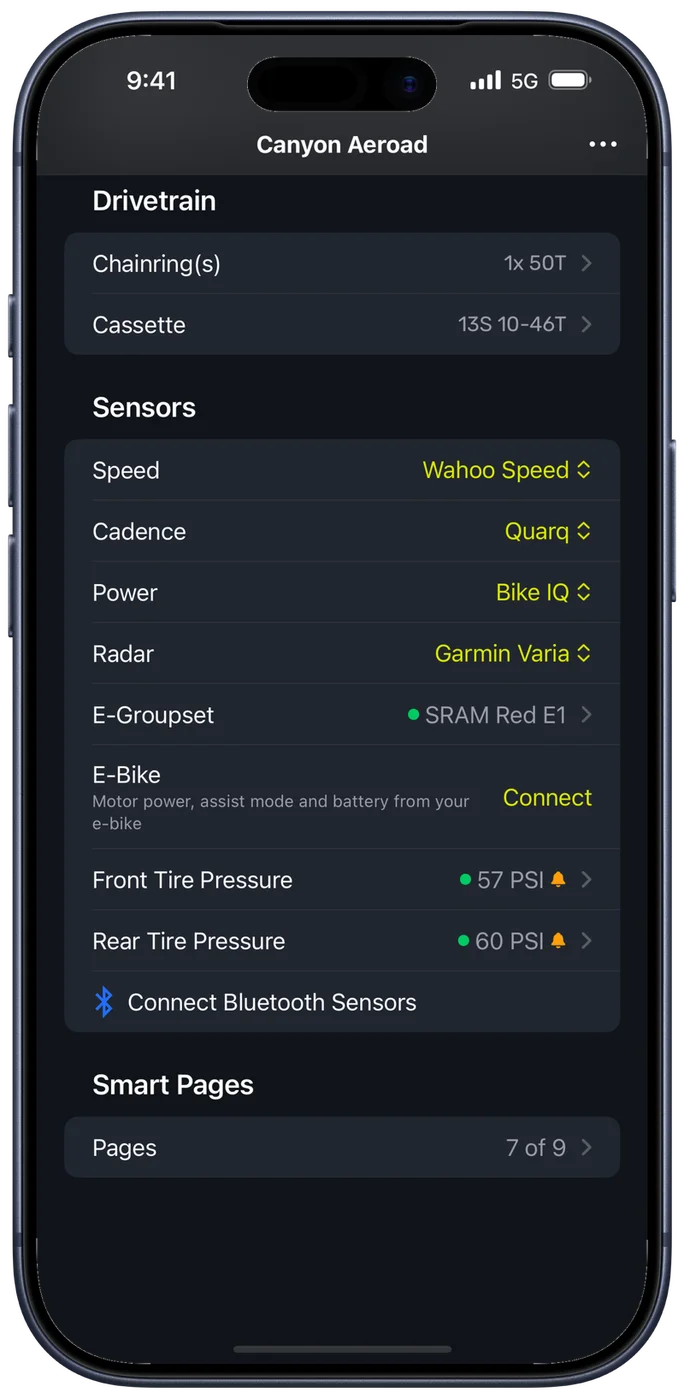
The Sensors list names what each slot is reading from, so you can tell at a glance that speed is coming from a wheel sensor rather than GPS, or that power is the estimate rather than a meter. Tire pressure shows its current reading, and the groupset shows its battery.
E-Bikes
The E-Bike row under Sensors connects an e-bike drive. With nothing connected it reads "Motor power, assist mode and battery from your e-bike", and Connect opens the sensor list. A connected drive gives you the motor's power, the assist mode and the e-bike's battery, and doubles as a power, cadence and speed sensor.
Bike IQ reads TQ HPR40 and HPR50 drives today. If yours is not one of them, tap Can't find your sensor? in the sensor list. That request carries what your bike is broadcasting, which is what makes a new drive possible to add.
Pages for This Bike
The Pages row shows how many of your Smart Pages are available on this bike, as a count out of the total. A page you only want on the road bike stays out of the way on the others, and this is where you see that at a glance and change it.
Selecting a Bike Before Riding
Before tapping Start Ride, open the garage and tap the bike you are on. The app uses that profile's weight, tire, and aerodynamic settings for the entire session. If you forget to switch bikes, the power model runs with the wrong parameters, which affects accuracy, especially if the bikes differ significantly in weight or handlebar position.
Make it a habit to confirm the correct bike is selected before every ride. It takes one tap and ensures your data is clean.
Per-Bike Calibration
The physics model calibrates independently for each bike profile. As you ride on a specific bike in varied conditions (hills, flats, headwinds, tailwinds, different speeds), the model refines its understanding of that bike's aerodynamic drag and rolling resistance. More rides on a given bike means better power accuracy for that bike.
If you also pair a hardware power meter on a bike, the model uses that as ground truth, which accelerates calibration significantly.
Editing a Bike
Tap the gear on a bike's card in the garage to open its settings. You can change the name, photo, weight, tire type, handlebar position, drivetrain, or sensor assignments at any time. Changes take effect on the next ride. They do not retroactively alter past ride data.
This is also where you link the bike to a Strava bike, so rides recorded on it are assigned to the right bike when they upload.
The menu in the top corner has Duplicate Bike, which copies everything you have configured into a new profile. It is the fast way to add a second bike that is nearly identical to one you already own, or to try different settings without losing the ones that work.
Deleting a Bike
Open the bike's settings, tap the menu in the top corner, and choose Delete Bike. Bike IQ asks you to confirm, because it cannot be undone. Sensor assignments tied to that bike are released, making those sensors available for assignment to other bikes. Past rides recorded with the deleted profile are not affected: they retain the settings that were active when they were recorded.
Related Guides
- Virtual Power Meter: how bike-specific settings feed into the power model
- Bluetooth Sensor Pairing: connecting and assigning sensors to bikes
- Settings and Customization: rider profile, units, and display preferences
- Getting Started: initial setup including your first bike profile